
Tuesday, July 9, 2013
Back Yard bliss - just before the clouds rolled in!
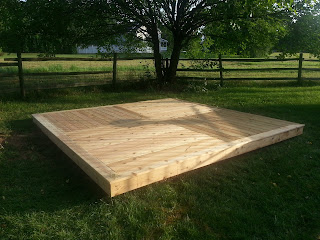
So here it is - finished just before the clouds rolled in Sunday night. The sanding and staining will have to wait until next weekend.

Sunday, July 7, 2013
Backyard bliss - some assembly required
First - Find simple deck plans on Lowes.com: easy deck. Pergola comes later = next year maybe
Go to lowes and place your order for lots of stuff for tomorrow pick up
Day one- Go to lowes and pick up lots of stuff, unload it in your yard and get busy

 Kraftman finally got to use his christmas present


Go to lowes and place your order for lots of stuff for tomorrow pick up
Day one- Go to lowes and pick up lots of stuff, unload it in your yard and get busy


This will probably be recorded as the hottest weekend of the summer = drink 15 bottles of water
Day two - things are coming along

Day three - repurpose rubble from front yard make over

Day four - has to get finished today. It's looking good

Tuesday, June 18, 2013
TA DA! After.


Sunday, June 9, 2013
Our ugly house - curb appeal - still before

Still before - could it have gotten worse? The new walkway is in. The beds get bigger as more sod is removed. Our driveway is full of soil, rock and mulch. Very stinky mulch. The good kind. I see light at the end of the tunnel.
Tuesday, April 30, 2013
12 tags of 2013 April
So here it is just under the wire. I followed Tim's instructions here timholtz.com/12-tags-of-2013-april/.
He's right, the effect is amazing. I love distress paint. Dabbing ig on the metal bits with your finger works great. I smeared a bit of black on the edges to give a bit of definition. I didn't have the same stamp so i substituted the butterfly from the SA spring sprung set. I used some leftover packaging for the overlay using Stazon. The stamp along the side is from one of the TH sets at Michael's.
Just when I think that ranger/Tim Holtz can't possibly come out with another product that I will need to have..... distress paint is truly unique and the results are really lovely.

Sunday, April 28, 2013
Our ugly house, curb appeal
As you have read, craft cupboard under the stairs was very happy to move into a new house and become bigger on the inside. And we are also very happy that there will be much scrapping of popcorn ceiling and wall paper and picking our new things.
As Spring has arrived, we now begin to focus on some curb appeal. Here was original front view


As Spring has arrived, we now begin to focus on some curb appeal. Here was original front view

What you may not see from this photo is that the multitude of evergreens shown here are very overgrown and much dead underneath. Perhaps you can see that they appear to be either attacking the house or at least making it impenetrable. Very foreboding and not at all friendly. What you also do not see is the tons of rocks underneath that required shoveling in order to clear out the space.
Here's how things look today

All ready to go! My wonderful sister-in-law scoped out a fabulous local landscaper and gifted us a certificate toward landscaping for Christmas. We met with said landscaper and are overjoyed with the plan he created. My dearest Kraftman will provide all the labor and our landscape artist will lay everything out and will not let us make a mistake. Check out my Pinterest board, titled same as this blog, to see our planting selections. Stay tuned.
Friday, April 19, 2013
Tissues and Tatters
We buy tissues in bulk, and have boxes all over the house. Yep, allergies. I rarely find tissue boxes or covers that I like. So here's what I did. This is the easiest and fastest craft ever.

Center your mini baroque mover and shaper on a 6"x 6" piece of cardstock. Using your Tim Holtz craft ruler to find center makes it super easy. I taped it in place with masking tape. Use your base tray and run It through your vagabond.
Score each edge @ 5/8" and taper each tab
Ink the edge of the cut out. For uneven edges like the baroque die cutout, I use the side of a distress marker tip.


Cut 2 pieces of cardstock 5" x 10 3/4". Score at 1 3/4" and again at 6"
Taper the end tab. Ink the cut edges. Fold on the score lines. Apply adhesive to the patterned side of the tabs Assemble into box shape.

Apply adhesive to the patterned side of the tabs on the box top. Attach to the inside edge of the box. Voila.

Now glam up with embellishments of your choice. I am using tattered florals.


Apply adhesive to the patterned side of the tabs on the box top. Attach to the inside edge of the box. Voila.

Now glam up with embellishments of your choice. I am using tattered florals.

Subscribe to:
Posts (Atom)