Wednesday, December 28, 2011

Holiday Left-Overs & GM 30

My studio (aka dining room) was packed up for the holidays and safely stowed in The Craft Cupboard Under the Stairs. Our new TH tissue wrap might have been in the deep dark recesses had the USPS not (as it turns out, luckily) routed my package north to NH rather than south to PA from the absolutely wonderful people at Absolutely Everything  (they are my favorite e-store and I swear Patti never sleeps). 

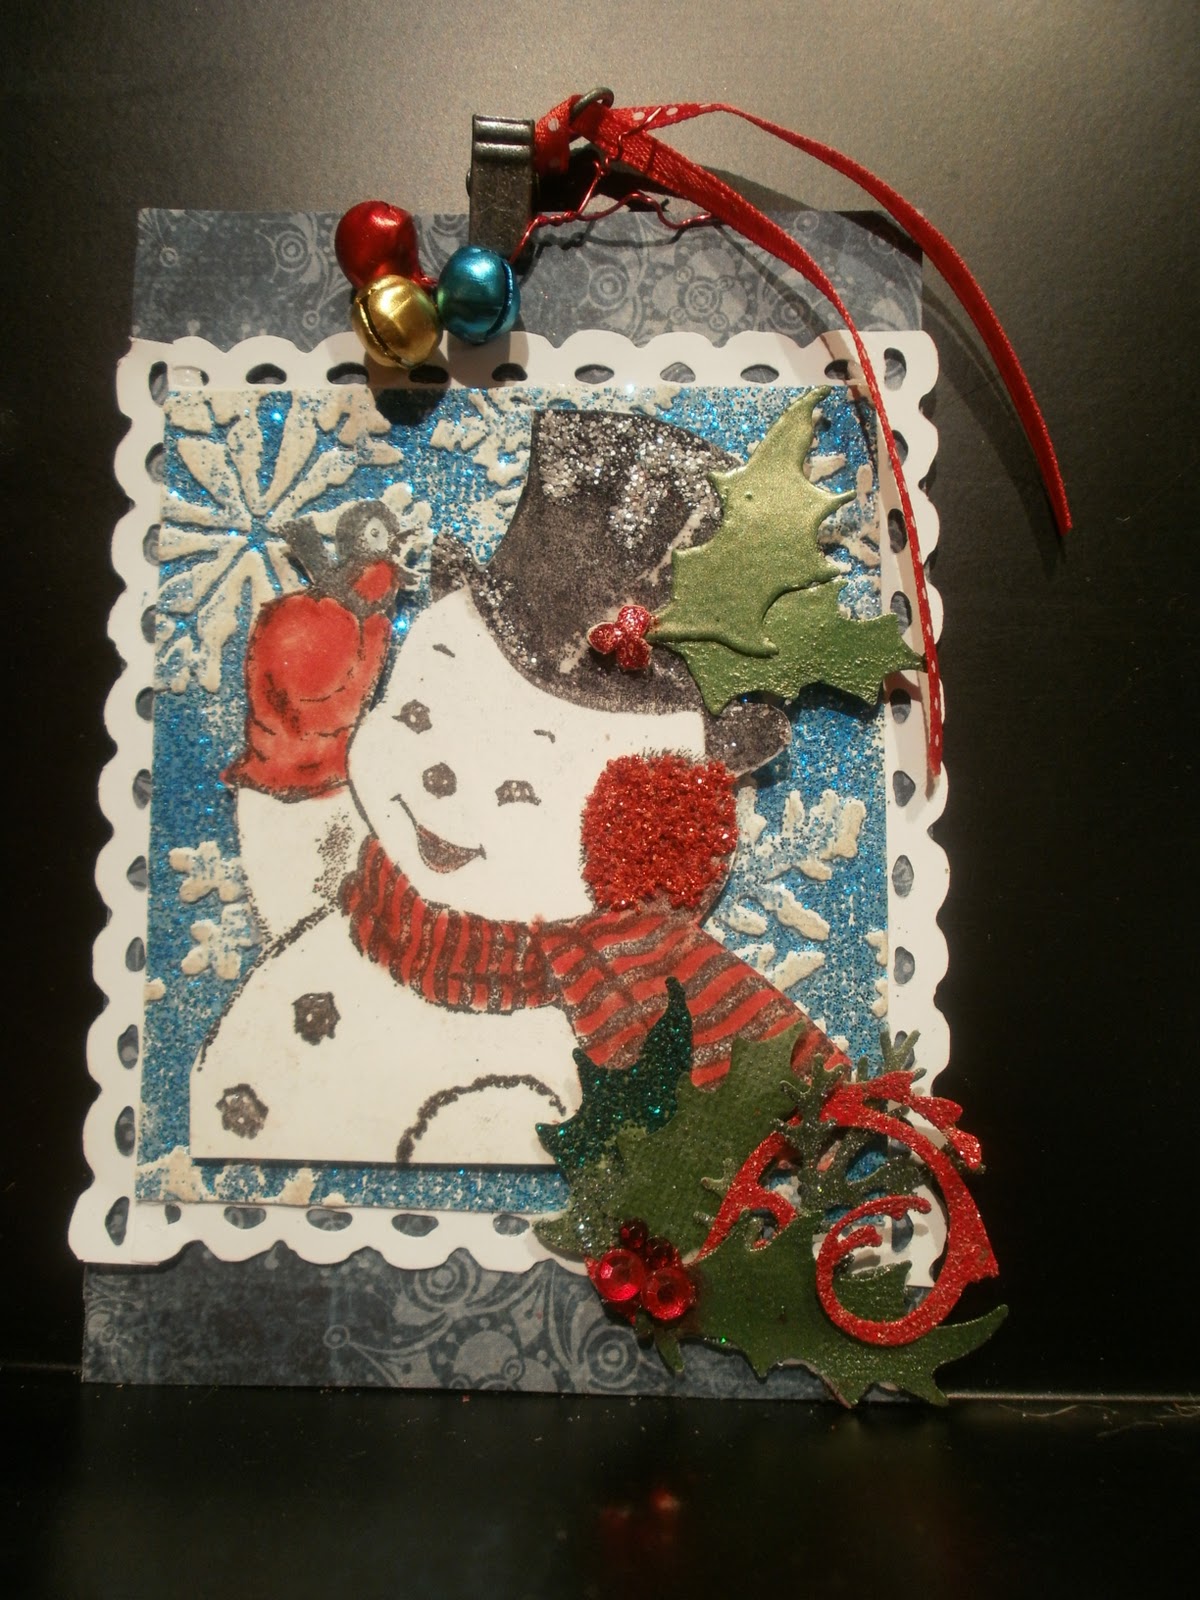
So when I saw this challenge at Studio L3 I started musing about what I might be able to try out on the fly.  While cleaning up pre-Christmas, I threw all the left over bits from TH 12 tags of Christmas into a baggy, to use (usually means throw out) later.  Strangley, I was able to put my hands on it right away (it was in the upper right hand box).  I used my new tissue wrap on a leftover inked tag and made the flower as per TH instructions on tag 12.  Then I glued on as many of the leftover bits as I could.  Although it looks a bit like the island of the misfit tags, it was fun whipping up something at the kitchen counter, and my dining room is still tidy.  Needs to stay that way for a little bit into the new year.  Hope I can hold out!

If you're making Tim tags - check out this challenge too at Simon Says Stamps:

Saturday, December 17, 2011

12 Tags of Christmas, Day 10

12 Tags of Christmas, Day 9

12 Tags of Christmas, Day 8

This tag was great fun!  I loved making all the bits

12 Tags of Christmas, Day 7

12 Tags of Christmas, Day 6 3/4

Friday, December 9, 2011

12 Tags of Christmas, Day 6 1/2

So this will be my entry for GM.  Click on my 12 Tags blinky to follow allong with Tim.  This was my tag 6.5.  I have 6 3/4 through 10 done, just not photographed and ready to go.  For some reason I kept going with this technique, having tons of fun with dabber and clear emboss or for the tag that I posted on Tim's site, I used UTEE.  I used metal tape from the hardware store and on this version, I used dauber in every color that I have with white on the roofs and stardust embossing.  The tag is cut from Tim's seasonal paper stash.  (I love my tag die!)  It's the blue reverse from a Christmas motive page.  I swiped it with snow cap dauber and stamped with silver ink.  Little tabs, from the same paper were used to attach  the houses and and I arched them out a bit.  The "donut' was silver dabbered and embossed.  I ran a silver sharpy around the edge and added silver ribbon.  There - done!  I love so many of the techniques that we've been doing on these tags, so it was hard to pick.  I know you're having just as much fun as I am!  Just one more to go......

Check out the fun too at Gingersnap creations.  I'm entering this in the starry nights challenge http://gingersnapcreations.blogspot.com/2011/12/gc129-chestnut-theme-challenge-starry.html

12 Tags of Christmas, Day 6


See What it's all about
http://simonsaysstampandshow.blogspot.com/2011/12/simon-says-stamp-and-show-tim-holtz.html
http://blog.inspirationemporium.com/
http://groups.yahoo.com/group/AllThingsTim/
http://www.timholtz.typepad.com/

12 Tags of Christmas, Day 5


See What it's all about
http://simonsaysstampandshow.blogspot.com/2011/12/simon-says-stamp-and-show-tim-holtz.html
http://blog.inspirationemporium.com/
http://groups.yahoo.com/group/AllThingsTim/
http://www.timholtz.typepad.com/

12 Tags of Christmas, Day 4

Sunday, November 6, 2011

Viola

Ruling Matriarch with a smile that would light a room

Used:
TH tag and flourish dies
TH seasonal distress
TH craft resist
rock candy crackle, stickles, copper embossing powder, spare lace, ribbon flower.

Thanks Linda for GM
Thanks Tim for inspiration and fab products

Sunday, August 21, 2011

I'm a bit creeped out

I have to admit, I’m a bit creeped out.  Probably because this is not where I thought I was going.  GM 20 this week is distress stickles.  My stock currently consists of rock candy and picket fence.  IMO distress stickles is perfectly suited for doing old fashioned post cards or scraps.  Gives the look of old glitter that’s flaked a bit over time.  Simon says stamp says show some bling, so I thought I could work both together into an old fashioned Halloween greeting.  In addition to the stickles and the bling I thought rosettes would add just the right touch.  It started glamorously enough….I cut a tag out of black card stock (TH die) and embossed a TH flourish in black.  Then I gave it a smear of silver dauber and scrubbed it off again.  The trouble started when I couldn’t find the glamour Victorian witch image that I was seeing in my head.  That’s when things started going in a different direction.  I had this old photo of someone’s progeny and started thinking about shopping some witches hats on them…..worked pretty well.  Suddenly, the fact that they were holding hands was no longer a good thing!  “If you don’t give us candy, we’re going to start chanting”. 
The rosettes (TH Mini Rosette die) were cut from a sparkly black coredination paper, layered with 2 of the Halloween TH tissue tapes and smeared with rock candy distress stickles.  Rock Candy also appears on the tag in a few spots, on the witch’s hats and along the edge of the laced.  The bling I picked up a Michaels.  It’s a really cool black/grayish iridescent color.   There’s some nasty looking feathers and the misshapen donut is picket fence distress crackle and UTEE.   If you’re here, you know what I mean by TH, but for the record, check out the awesomeness here
So, thanks for stopping by….I love your comments! 

Wednesday, August 10, 2011

Enough with the birds already

I know, I know, what’s up with all the birds…..I seem to be a tad bit stuck, but who cares. 
The challenge is GM 19. A fab tag from Tim’s 12 tags of Christmas from last year.  And Simon Says Stamp couldn’t make it any easier by asking for anything TH.  As you can see, I didn’t really do theGM challenge, but I was definitely inspired by it.  Lucky me, I had the package from a pair of Sizzix extended cutting pads.  It was exactly wide enough to cut a multitude of tags to play with. 
I really loved Tim’s concept of putting the snowflakes with the snowman and so I was really bent on finding embossing that “matched” the focal point of the tag.  With what I have on hand I just couldn’t find a connection that I like.   So, I started playing around with stamping.  I really like the way the TH flourish looked stamped on the packaging with Stazon.  Then I thought “what the heck” and ran the tag through again, using the bird cage die.  I tied the tags together with ribbon, then daubered silver on the back of the cage and attached it in the right spot, onto the bottom tag with a brad,  the rest of the tag is held on with the ribbon.  The bird is multi-layered heat emboss/UTTE.  First, silver dauber, sunset orange alcohol ink, UTTE, heat, a sprinkle of platinum emboss, heat.  I found the home brew glitter misted Love stamped piece just hanging out on my craft table so I put it in a multi layer embossed book plate.  Similar layering to the bird, no AI, but sprinkle of blue pearl emboss.
The background tag was a left over from creating last week’s tag.  I had a piece of manila card stock that I was using to slurp/wipe up the oversprayed glimmer mist from my craft mat.  I cut my tag from it and left it as is.  The bling was colored with more sunset AI.  I dyed the ribbon by putting it in a baggy sprtizing a few times with sunset colorwash and then squishing it around in the bag. 

So, I didn’t follow the challenge but held true to the inspiration.  I used packaging and some other recycled/repurposed  items I found hanging around and most importantly had a blast putting it together. 
Many thanks for stopping by and leaving a comment! 

Sunday, August 7, 2011

Bird under the wire

So here I am, getting in just under the wire.  Simon Says Stamps is doing tags and the Lovely Linda at Studio L3 has selected another wonderful technique from Tim Holtz techniques of Christmases past.

I wasn't inspired by any of my stamps to create a parchment piece, so my head was going in a bunch of different directions on this.  Then I started wondering whether or not I could print on the vellum and have it turn out ok.  Imagine my surprise!  This music piece has been a favorite of my dd (12 yo) for a few years since a summer orchestra program.  Because of her excitement over its selection for the fall concert of the youth orchestra she belongs to, I thought it would be perfect to glamorize it in a tag.  I shrunk down the first page of the music to 4 x 6, printed on my inkjet, and continued as per Tim’s instructions.  A very light hand was required on the blending, but I turned out just fine.  The tag background is silver dauber and home brewed perfect pearls mist.  The rosette is the smallest, cut from vellum, tissue taped (music staff) inked, then added spritzed paper flowers.  The die cuts and donut were multi layer embossed using embossing powder and UTEE, then they all took a ride through my Xyron sticker maker (l love that thing for sticking down embellishments).  Added a TH corner and spritzed a white organza ribbon.  Done…right under the wire.

Wednesday, July 27, 2011

Le Loup Garou (Or GM 17 & SSS)

Odd that the concierge would caution her against going out on just this particular night.  Odder still, was that a gentleman would toss his lovely homburg on the ground.  Still, she was a modern girl and in Paris for an adventure.  If she had only paid closer attention in French class she might have understood the concierge when he said “Le loup garou”.

This week’s Grungy Monday is all about Rock….Tim Holtz Rock Candy Distress crackle paint and Rock Candy Distress Stickles no less.  One of the best things about these challenges is the journey that I take from my original idea, to the end results.  Often miles apart.
I picked up this postcard at flea market.  I’m sure in its day (postmark is 2/10/1908) it was considered romantic.  However, no doubt influence by current pop culture, I find it interesingly creepy.  Full moon, dark sky, sinister house in the background….
I scanned it and shrunk it down to about ATC size.  With TH stamps, I stamped and embossed the clock and luggage sticker.  Both got a nice coat of crackle.  When the crackle was ready, I rubbed block soot DI into the cracks and wiped off the surface.  The frame holding the ATC has rock candy stickles smeared on it.  I scanned the map from inside cover of an old French text book (1948), printed in on cardstock and cut a tag using my TH die.  And of course, it’s stamped with a flourish and blinged and fluffed.
Fabulous that I actually finished a challenge before Sunday!  Maybe I’ll have time for another one this week.  Speaking of that Simon Says anything goes….so here goes

Tuesday, July 26, 2011

Octopode Factory Friday Challenge - 2fer

I’m quite behind my time, so this post is 2 for one.  It’s not that I didn’t have it done…..just couldn’t seem to get it photographed.  Anyway….
Octopode Friday Challenge for 7/15/2011 was tell me a story and “Good Night Moon” popped into my head.  So here’s my beddy-bye tag…..

Octopode Friday Challenge for 7/22/2011 is spots and dots and I had quite a bit of fun with Hook (who looks a lot like J. Sparrow to me….my fav pirate).  MY Darling daughter assisted by dotting  the background in colors to match Hook’s wardrobe.   Then, I  spotted it using one of my new favorite techniques: smack distress stain really hard, head first on your tag.  The little sign reads “Get your ARRH on!”  An early sentiment for International Speak Like a Pirate Day (Sept 19th).  Don’t say I didn’t give you ample time to prepare  
          

Sunday, July 24, 2011

GM 16 & SSS

Linda said Gunge Paper or Board and Simon said emboss and you really can’t get any better than that.  Now, Grunge is an awesome medium.  The best of say, leather and paper and it lends itself to major construction projects.  It’s easy to cut/pierce and extremely pliable.  I, however, was never going to be able to pull off a construction project this week and was in need of another prompt.  My favorite crafting cohort and consult said birdcage and off I went.  The TH baroque frame, cut from grunge board,  has been dry embossed with a texture fade and had various coloring items applied to it.  Home brewed glimmer mist, distress inks, stains and a schmear of silver dauber.  The bird cage, bird,  flourish and donut, all grunge board, have  been heat embossed and then Uteed.  A deliciously unpredictable embossing method that I learned from Stamptramp.  The only “construction” I did was to prop up the various levels of materials.  The bird was easy to align with the bird cage and frame, using foam tape.  The flourish was cut again from grunge board and cut and glued where needed to make the whole thing lay over the frame and cage correctly.  What fun!  The tag is super sparkly with home brew PP mist and stamped with my favorite and first TH stamp in silver.  I’ll ad more “stuff” when I can catch another minute or 2. 

Check out everyone’s fabulous creations at Linda’s Grungy Monday Challenge and Simon Says Stamps (good luck to all design team entries).  And here’s where you can check out all of Tim Holtz’ wonderfulness.

Sunday, July 17, 2011

GM 15

It’s good that I made something, and tried out this challenge, because it’s just good that I do.   Usually I can just start and the bits will start falling into place.  Or something doesn’t turn out right and then I know what will.  That didn’t happen this week.  The first piece I started was sad and it was imperative that I make something happy this week.  Dots are definitely happy and the sentiment is right and you can see some sunshine poking out of the dark cloud.  Next week will be better. 
Take a look at Tim’s Demo and Studio L3 and you’ll see how you really can make something stupendous out of this technique.

Saturday, July 9, 2011

3 Words, 3 Papers and 3 Buttons or Biological Clock II

So, I wanted to enter this challenge at Gingersnap Creations because I have several very elegant and beautiful buttons that I wanted to use in my crafting.  That’s not what happened. 

To read about the birth of Bridesmaid check my other post today for the Octopodes Challenge.  What I love about challenges is that I would have never thought to put together these papers, these buttons these gears and this stunning beauty.  First, the beauty was born from an Octopode Collage.  I followed the original colors and just loved the results.  Then I started thinking about 3 words.  Here’s some I tossed around, not necessarily in order of preference:

1.     Ready Mr. DeMille
2.     Maybelline Of Course
3.     He Was Late
4.     Actually I Don’t

I decided on “Always The Bridesmade” and moved forward.  I pulled 3 wedding looking papers in the same colors as her gown, ripped and inked the edges.  Gears were of course required, but in an elegant tarnished silver with bling.  The buttons are plain white shirt type buttons, colored with TH eggplant alcohol ink, strung on silver wire and used to hook the word tag.

Fabulous challenge.  Please check out Bridemaid’s sister Hardly Alice in my other post today

Biological Clock


So, it takes a challenge.

One of my favorite people to follow (in the new hip way, not the old fashioned creepy way) is Cuddly Bunny over here.  Her art and sense of humor always put me in a better mood.  So, lucky me, as it turns out, I won a giftie that she was offering on her blog, SIX fabulous collage sheets from Octopode. WOOO HOOO big time. 

So, I’m looking at them, admiring them, admiring other people's Octopode creations and have no idea where to start.  UNTIL, I saw the Octopodes Friday Challenge.  Now, I’ve got a theme “TIME”.  I grab a Steampunk lady and start dressing her for the party.  I started with her original colors when another idea altogether hit me, so look for her on the other post today.

I grabbed the same Steampunk lady and started again, but this time she’s Alice.  Alice is wearing a tea length gown in Tim Holtz Distress weathered wood and stormy sky.  The background is the same technique from  GM 14 at Studio L3.  This is a technique that I just love – I wish you could see how beautiful the shimmer looks.  Check out the how to here.   You’ll see the white rabbit from Tim Holtz Spring Sprung running through the background.  I used the tarnished silver technique that I learned from StampTramp.

You know what’s great?  Ranger perfect medium pen, so you can emboss what you want (gives new meaning to the term blue eyeliner).  The other thing that is great is that stickles picks up the color of ink underneath it.  Awesome.

Like I said, look for her sister “Bridesmaid” in my other post.  She’s walking the runway at Gingersnap Creations.

Tuesday, July 5, 2011

An embossed, sparkly, hot,hot, hot Flourish

For Grungy Monday 14 over at Studio L3, Linda has an awesome challenge this week.  If you are product impaired this week, definitely put the required on your wish list.  The results are absolutely amazing and the photos you’re seeing can’t do it justice.  I started the project with one of my first TH stamps, from fabulous flourishes, on manila tag with white dauber.  This dried  while I was concocting my potions.  I really wanted to go with Hel’s fabulous Ink Mirepoix of Mustard seed, spiced marmalade and fired brick.  Not sure when I saw it on her blog, but I used it first on GM 11 and LOOOOVE it.  Luckily I had those 3 reinkers.  The perfect pearls to add was a bit more challenging, since I don’t have a wide array.  I probably could have gotten away with adding gold to all three, but where’s the fun in that?  So….for the Mustard seed I used sunflower sparkle, for the marmalade I used Heirloom gold and for the Fired brick I used Berry twist.  A few spritz later and I was blown away!  I really had a hard time covering any of it up.   The TH bookplate is embossed using Stampendous, Pearlustre Sapphire, using the technique I learned from Shelly Hickox, and grunged with a tiny rub of black dauber.  Same treatment on the donut.  AI’d bling and TH stamp from Michaels in Ranger black archival.  The flower wreath on my cutie patootie was colored with above 3 reinker colors using the  DI pad and a Ranger nib.  The seam binding was inked with the 3 colors, plus one more with chipped sapphire. 
After I make several more tags with this technique (and I will – I have great ideas for Christmas!) I probably will load it up with embellishments.   For now, I just have to admire the beautiful color and sparkle. 
Thanks Linda, Simon Says Stamps, The Artistic Stamper and Inspiration Emporium for the great challenges.  As you can tell from the above, if it wasn’t for the challenges and all the artists sharing their talent, I wouldn’t know how to do anything!

Sunday, July 3, 2011

Simon Says “Show a Word” – Peace


Happy Independence Day USA.  I got my inspiration from…..Tim Holtz (So, how many times have you said/heard that one!)  Anyway, I really liked what he did on his blog this weekend.  So, here’s my timely tag for SSS Show word challenge.  I thought I might try adding some fireworks with Distress Stain like Deb Corder did here.  Awesome, right?  But, I think I want that to be the feature in the next 4th tag.  Or the ruffle that Shelly Hickox did here, but I didn’t have the right color to make it work.

So, I did the burst same as Tim, Embossed some stars with sparkle blue and red distress.  The grunge paper letters are silver alcohol inked, then glammed with stickles.  The ruffle was made with layers of crepe paper.  Snip, glue, glue, pinch, fluff.  The trim was from a dollar spool,  that I colored with color wash.  It looks like a blue caterpillar.   But, I had a long struggle to make it (suffice to say stain everywhere) so I’ll look at it for a few days,  then replace it with something nicer.
Yesterday was beautiful, but it’s raining here right now.  Hope it doesn’t spoil anyone’s plans for the 4th.  Great day for a movie!

Wednesday, June 29, 2011

Grungy Monday 13 Alcohol Inks


I first encountered Alcohol Inks here – Tim Holtz 12 tags 2009 day 10.  Really didn’t think it was much for me.  DH loved it right off the bat though.  So for a while it was mostly “Honey, could you make this look rusty for me?”  But now, I have to say, I probably use it on just about every piece.  Hasn’t ever been the focal point, but always invited to the party.  I buy clear bling and white pearls and ink them to match.  I buy metal chains, charms and attachers from the clearance section and overlook the too shiny, brassy or strange color finish, knowing that I can fix that with AI. 

So….last Sunday we’re at Michaels, coupons in hand.  I say “How about more AI?”  The reply is “Nah – we have enough”.  But I’m thinking that we need a green (lettuce) and the butterscotch looks pretty good.  So, a new pack of AI comes home with us.  I wanted to try them out right away, so I took out a cheap (Oriental Trading) piece of “copper”, texture fade it and splotch all over with every color that we have.  The “copper” comes off the bit of metal, but all the better.

Next day, we check Linda’s blog for Grungy Monday challenge no. 13 and DH accuses me of having insider info! 

SO….this will be my first time using AI for something other than a bit player.  I envisioned something with the new TH Queen of Hearts texture trade and recycled packaging (from said texture trade).  Numerous attempts come out VERY SCARY looking.  HHHMMMM – what to do?  I’ve always held the opinion that if you run something embossed through the vagabond with a die you will totally smash the embossing.  At this point,  what the heck.  So I take the piece of inked foil from paragraph 2 and cut the bird and cage.  Embossing survived very nicely!   I should have laid the foil ink side down on the die but  live and learn.  (craft and learn?)  The flower and crown started out life as shiny silver.  All of the bling was clear crystal.  That’s a TH facet, inked on the back. 
Very fun challenge!  Thanks again Linda!

Sunday, June 26, 2011

Letters to My Love GM 12

The first fun step of any of these challenges is to brainstorm what I have on hand to create my piece.  The guest artists do a fabulous job of demonstrating that it’s meant to be inspiration not emulation.
My biggest product limitation is the paint daubers that I have.  I was pretty sure that it would have to be either black or red.  What I saw in my head was something made from my 7 Gypsies Lille stash.  I love this paper and thought it would be great.  BUT, another big product void was a large area stamp.  Got nothing’there.   Without that, I didn’t think I could do the paper justice.  {My 12 yo loves all phobia words and is on a mission to learn as many as possible….what do you call the fear of breaking out the good paper?}.  So, playing it safe, I used the stamp from last week’s challenge because that worked really well for masking and a piece of K&Company Life’s journey (old correspondence in sepia/cream).  I used the same paper for the tags, pocket, “ribbon” and tab. 
A lot of the red dauber came away but I liked the script showing through.  I used the same background stamp with barn door on the pocket, stamped over it in aged mahagony using a stamp from Tim’s mini classic collect.  It’s attached  with 7 Gypsies Lille tape.  I also used the mini classic collection on the little tag.  I stamped “Love letters” on another strip of paper and strung it through a brad from my stash.  The brad was an awful color so most of the paint was removed with steel wool and I colored it with Cranberry and Rust alcohol inks.  The tab has “To my Dearly beloved” stamped on it with Sepia Archival.  I think this stamp is Hampton Arts.  I used flourishes from the same set on the top of the mini-tag. 
The charms come from the clearance section at Joann’s, Michaels or AC Moore.  The pins used to attach come with the tags on my favorite clothes bought at Kohl’s.

Friday, June 17, 2011

GM 11 Faux Batik
If you didn’t get here from Studio L3 – take a look.  The lovely Linda entices us each week with a new challenge using techniques from Tim Holtz.  This is how I’m learning how to paper craft!  Trying out something from Tim and being totally blown away by what everyone else submits.  Every week, I take a look at what the guest artist have created and try to figure out what the technique is before hopping over to the Tim Holtz demo.  Yep, most of the time I have no clue, but it’s awesome to see how each person interprets the challenge and makes it their own.
I’ve embossed using DI before.  As a matter of fact, I like the security of seeing where the stamp is, compared to using regular clear embossing ink.  But this week, I just couldn’t get the clear embossing powder to listen to me.  It just wasn’t sticking to the ink.  I dunno, lazy powder or too dry DI pad.  Anyway, no go.  A couple of botched backgrounds later, I decided to try something else.  So I didn’t exactly do it right, but I was happy with what I got.  I started out by inking my tag with scattered straw, then used distress embossing ink and clear embossing powder with an ornate background stamp.  I inked over the whole thing with mustard seed, spiced marmalade, fired brick and walnut stain.  Then, I ironed as per directions using an old travel that could truly be at least 30 years old.  Imagine my surprise when it all worked!   The stamping and ribbon are chipped sapphire.  The frame is “tarnished” using Shelly Hickox’ technique.  (Truly, check out her genius on her blog).  Add the usual bit and bobs and there she is.  Please leave me a comment, even if just to say hi!  I’d love to hear from you.

Sunday, June 12, 2011

GM 10 Distress Ink---Tag pull up card thingy

Distress Ink – Ink ink ink ink ink…… 
Fabulous challenge for GM 10.  Using Tim Holtz Distress Ink.  Check out the videos on his website!
Mostly dusty concord and some aged mahogany.  Started out with a lot more colors.  Used the TH stamp from new visual artistry collection that matches the texture fade that I used.  I inked in a variety of colors and stamped over silver dauber then I embossed using dusty concord on the folder.  Not much of any of this shows on the cover, but it was fun none the less. 

The cage is embossed grunge board .  Dusty Concord DI was applied first using ink on the mat with spritz and then inked somemore with foam applicator.  I added some tiny splatters of dusty concord distress stain.(By the way, the grunge board in the embossing folder went through the vagabond like butter and turned out geogeous).  Added glossy accents over all.

The ATC underneath was done the same Dusty Concord recipe with the addition of some stickles. It was cut down a smidge and slipped into another ATC that I had daubered with silver and punched the edges.  The bird was cut from a left over bit from the pull tag.  There’s dusty concord DI on the mat around the ATC and on the tissue tape.
The back of the pull tag and the gears were done in the same way with Dusty Concord DI ink with a tiny splatter of Distress Stain.  The embossing folder was DI'd with Aged Mahogany.


The front of the tag is silver dauber with Dusty Concord DI on the embossing folder.  The stamps are also other new Tim Holtz  Visual Artisty stamps in Black Archival ink with Dusty Concord DI blended on. 


I used The Tim bird cage, big tag, gears and ATC card dies (did I have fun or what?).  The hole reinforcer is cut from the metal bit that came off a wine bottle – it was that color already.  The ribbon was white organza, but I inked it with, you guessed it, Dusty Concord Distress Ink.  I started out wanting to use a bunch of DI colors, but then, I was just loving how the color of one ink changed depending on the application.  Also, loved doing some of the stuff I had learned from previous GM challenges.  Distress ink, ink, ink, ink, ink.  Must go shower.

Tuesday, May 31, 2011

Grungy Monday 09

Grungy Monday 9 – Shabby Chic

What a mess!  This is definitely Grungy and Shabby, but I have to say. I’m kind of fond of it.  It’s the process not the product. 
This is for Linda’s Grungy Monday challenge over at Studio L3.  She has a wonderful thing going on, and if you didn’t get here from there, you should definitely check it out.   This week she picked a technique demonstrated by Tim Holtz here.  I’m pretty new to all of this, so everything she’s picks I’m trying for the first time.  It’s a blast!.

I painted my cardstock with black dauber as per TH.  Then I cut a stamp out of fun foam using my brand new TH cage die.  Also got this idea from TH.  It’s a great two-fer – you can find all kinds of great tips like this on his website.  I used this new stamp and the TH flourish stamp to do the clear embossing.  I am very limited in daubers and didn’t really want to use any of the colors that I had so I used another green acrylic paint that I had with some snowcap and silver dauber.  This is where the trouble started…..I couldn’t get the paint to wipe off.  Probably the other brand acrylic isn’t suited and I don’t think the silver dauber is suited very well either.  Plus the foam I used for the cage stamp was way too thin to have the stamp turn our nicely.  I read over on All Things Tim that if you don’t have the thick fun foam, glue two layers together.  Definitely a good tip.  I'll have to do that next time.  So…I had to pretty much scrape the paint off the embossing and took some paper with it.  The flourish turned out okay but definitely shabby.  The cage, due to thin stamp, turned out badly, but when it popped in my head that it looked like someone had drawn it on a wall with charcoals, I decided I liked it anyway.  So, I pressed on.  Next, I tried the tarnished silver and enamel technique that Shelly Hickox demos on her website.  If you haven’t check this out, you’ll want to.  She’s a genius with the techniques.  She just made this amazing telescoping steam punk card!  Check it out! 

Anyway, the number plaque thing is supposed to look like white enamel.  Well, seems my perfect medium had all kinds of STUFF stuck to it and the pad had actually turned to this mushy mess.   I applied it before the numbers had dried and also managed to pick up some green color, probably from my craft sheet.  Bottom line, added more mess to the mess, but I still don’t hate it.  You can’t see it very well in the photo, but the wing turned out okay, it has a pretty green flourish on it.  It did however crack.  I still don’t hate it.  I added some bling , a sentiment from the computer inked with DI peeled paint and a kiss of silver dauber, somemore bling, a silver daubered mat, oh and some stickles too. 
Like I said – it’s the process.