Tuesday, March 26, 2013

Good for what ails you / sugar scrub

So the State of Ohio wants to endict Punxsutawney Phil for his incorrect prediction regarding onset of Spring.
A bit harsh I think, but I get their point.  I'm pretty tired of winter myself, the on again off again weather, winter clothes, events cancelled and then causing havoc by rescheduling.  So there's nothing like a winter pick me up.  I love this scrub for getting rid of dry winter skin and if you're lucky you might even have the ingredients on hand even if you're snow bound.

2 tbs olive oil
2 tbs honey
1 tbs lemon juice
6 tbs to 1/2 cup sugar more or less per personal preference

Stir in the sugar gradually until it's a consistency that you like.  Then just scrub away winter.

Wednesday, March 20, 2013

12 Lamps of 2013 - March


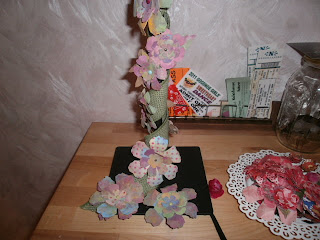
Yep, it’s a twofer.  Here’s my March lamp.  I wanted to use most of the inspiration and many of the elements of Tim’s card plus fill in the blanks with tattered florals.  Here’s how it worked out:
I don’t have the mini bunny, so I knew I would have to use the tattered floral mini instead.  Since I had more room to work with, I used it with the Baroque die.  I was surprised to find a piece of white coredinations in my stash – not kraft core, more vanilla, but definitely a good stand in.  Sanded and inked as prescribed.  I knew that I wanted to use the inked tinsel for the shade bottom, so I inked some ribbon and wrapped it randomly around a spare bit of card stock and attached it behind the floral.
I have the holiday paper that Tim used and after studying the sweet images for a while, I decided that I didn’t want to cover them up.  I cut each one out, rounded the corners, ran the edges around the nib of a silver sharpie and attached them to the shade with brads.  (I used mostly brads and hot glue for attaching – not sure if adhesives would melt when the light is on).
I don’t have the grass die, so that was a complete pass and as I mentioned I wanted to use the tinsel as the lower edge.  I inked another piece of ribbon and tied it around the baroque ornament.  It was still looking a bit naked so I cut a frame out of black chip board using the mini baroque and did a tarnished silver finish, by doing a multi level silver embossing powder, UTEE, silver, UTEE – keep going until it looks awesome then STOP.


For me, the real star of this show is how really brilliant distress paint looks on metal!  Amazing!! I used the recommended foliage bits as a much needed embellishment for my beribboned floral /baroque thingy.  Now I want to paint all of the brads on my tattered florals.
So, with the elements of the tag done, I started hot gluing on the florals.  I used a piece of green wired burlap to loosely wrap around the lamp base, then added more florals.   I will tell you honestly that I was  amazed that the ribbon actually stayed put where I wanted it, with just a little bit of tape holding it in place at the top  and bottom.  For the lamp shade,  I was  pleased to find some robin’s egg blue chalk board paper in my stash that worked out quite well.  It takes 2 pieces: each  8 ½” high, 9 ½ wide, overlapped by 1/2“ and secured with brads.  I use the proved IKEA lamp shade as a template to poke the holes for the shade internal bracket thingy.
Love my lamp.  Thanks Tim for the inspiration and education!!!


TATTERED FLORALS!!!!


Ah Tattered Florals.  That’s where it all started, isn’t it?  This was several years ago and I can’t remember how it started, something to do with wanting to make notebooks out of recycled paper.  Somehow I stumbled on TH’s web site.  I watched every video.  Rewound – took notes.  I let it stew for a little bit.  Then, one day soon thereafter, sitting in the living room watching TV, I surprised even myself by saying to my husband “I want a Sixxiz Die Cut machine with A Tim Holtz alterations steel rule tattered flower die for my birthday.”  “A wha??”  says he.  “Here let me show you” says I and I showed him the videos and my little notes:  Stickles rock candy, distress ink, blending tool, perfect pearls,  distress embossing powder.  I remember it all well.  Now, a few years and about a million escudos later, I have the craft room of my dreams.

So my first Tim Holtz treasure combined with my latest Tim Holtz treasure!  What fun.  I took my fabulouso new distress paints and smeared them on my craft sheet using varying amounts of water.  Then I dragged, blotted and generally sloshed around with various bits of paper.  I wanted to use recycling so it was old manila folder, some packing paper, tissue paper and the top layer ripped off of a piece of corrugated  cardboard.  If a piece was too saturated I would smash another piece one top to mop up the excess.  Then I ran it all through the Vagabond (yep, upgraded as soon as I could) using the tattered floral Bigz, decorative strip and movers & shapers.  That gets you a huge pile of various flower shapes and leaves to randomly assemble.  Tattered floral spring time bliss.

Check out Tim's challenge here  http://timholtz.com/tattered-floral-challenge/.  and while you're there, check out the videos.